Essential Knife Skills Every Home Cook Should Master

What are the basic knife cuts every home cook should know?
The five foundational cuts—julienne, brunoise, dice, chiffonade, and mince—form the backbone of efficient kitchen work. Master these and recipe prep time drops by half. You'll move from hacking at vegetables to slicing with purpose, and the difference shows in both cooking time and final presentation.
Julienne means cutting food into thin, uniform matchsticks—roughly ⅛ inch by ⅛ inch by 2 inches. Carrots and potatoes love this treatment. Brunoise takes julienne one step further: those matchsticks get turned into tiny cubes, perfect for garnish or fine sauces. Dice comes in small, medium, and large varieties—think of it as the utility player of knife cuts. Chiffonade applies specifically to leafy herbs and greens; you'll stack leaves, roll them tight, then slice thin ribbons. Mince? That's your fine chop—garlic, shallots, ginger—pieces so small they nearly disappear into the dish.
Here's the thing: consistency matters more than speed. A pile of unevenly chopped onions cooks unevenly. Some pieces burn while others stay raw. That frustration you feel when dinner takes forever? Often it traces back to sloppy prep. Clean, uniform cuts cook evenly and look professional—even on a Tuesday night.
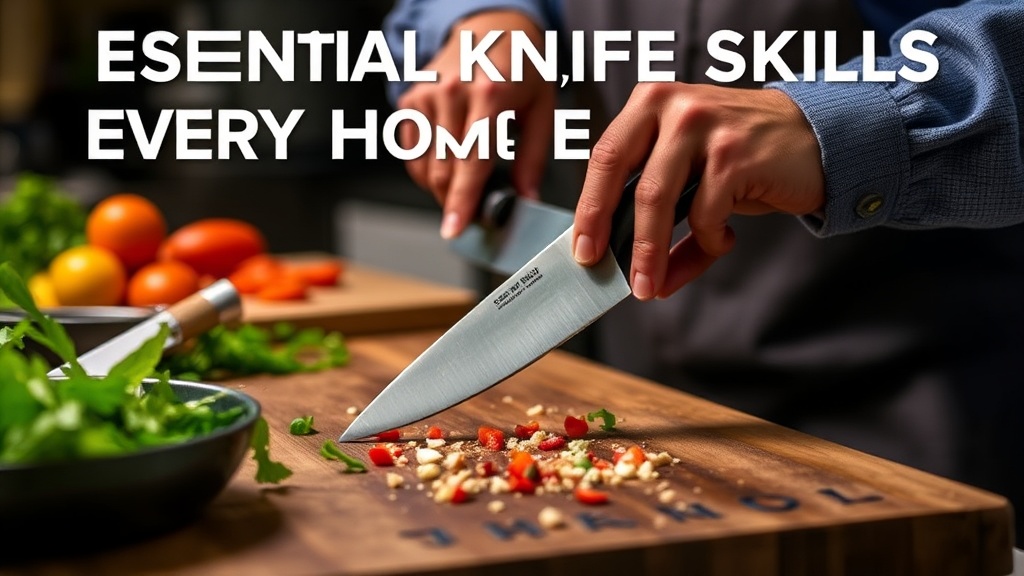
How should you hold a chef's knife for maximum control?
The pinch grip—thumb and forefinger pinching the blade just above the handle, remaining fingers curled around the handle—gives you the best balance and precision. Ditch the handle-only grip taught in poorly researched cooking videos. That grip forces you to work from the wrist, which tires quickly and lacks finesse.
With the pinch grip, the blade becomes an extension of your forearm. You cut from the shoulder, using the entire arm as a lever. More power. Less fatigue. Better results. The other hand—the guiding hand—curls fingertips under, thumb tucked behind, knuckles against the blade. This claw position protects fingertips while providing a guide for consistent cuts.
Practice the motion without food first. Rock the blade forward from tip to heel on a cutting board. Feel how the pinch grip lets you control that rocking motion? That's your bread and butter for 90% of kitchen tasks. The Serious Eats guide to knife grip includes excellent photos if visual learning works better.
Which kitchen knives are actually worth owning?
Three knives handle virtually every home cooking task: an 8-inch chef's knife, a serrated bread knife, and a small paring knife. Everything else—boning knives, cleavers, santokus—serves specialized purposes most home cooks encounter rarely.
The chef's knife does the heavy lifting. Vegetables, proteins, herbs—it's the workhorse. For this, the Wüsthof Classic Ikon 8-Inch Cook's Knife offers German durability with a comfortable handle. Prefer something lighter? The Mac Professional Hollow Edge Chef's Knife (MTH-80) has a cult following among line cooks for good reason—razor sharp, well-balanced, and the dimples prevent food from sticking. Either will last decades with proper care.
The serrated knife tackles bread, tomatoes, and citrus. Don't overspend here—a Victorinox Fibrox Pro 10.25-Inch Serrated Knife runs under $50 and outperforms knives triple the price. For paring work—peeling apples, hulling strawberries, detailed trimming—the Mac 3.25-Inch Paring Knife fits the bill without breaking the bank.
| Knife Type | Primary Use | Budget Pick | Investment Pick |
|---|---|---|---|
| Chef's Knife | Chopping, slicing, dicing vegetables and proteins | Victorinox Fibrox Pro 8" (~$40) | Mac MTH-80 or Wüsthof Classic Ikon (~$150-180) |
| Serrated/Bread Knife | Bread, tomatoes, citrus, delicate items | Victorinox Fibrox 10.25" (~$45) | Wüsthof Classic 10" (~$120) |
| Paring Knife | Peeling, detailed work, small items | Mac 3.25" (~$25) | Wüsthof Classic 3.5" (~$60) |
Worth noting: expensive doesn't always mean better. A $200 knife neglected becomes worse than a $40 knife maintained. The catch? Quality steel stays sharp longer and sharpens more easily. Cheap knives go dull fast and resist honing.
How do you sharpen and maintain kitchen knives properly?
Honing realigns the blade; sharpening removes metal to create a new edge. Most home cooks confuse the two. That steel rod hanging from your knife block? It's a honing steel—not a sharpener. Use it weekly (or before heavy prep sessions) to straighten the microscopic teeth on your blade's edge.
Actual sharpening requires removing material. Options include whetstones, pull-through sharpeners, and electric systems. Whetstones offer the best results but demand practice—a King 1000/6000 Grit Combination Whetstone serves most home cooks perfectly. The 1000 grit side repairs and sharpens; the 6000 grit polishes to a fine edge. Soak the stone 10-15 minutes before use, maintain a consistent 15-20 degree angle, and work slowly.
Pull-through sharpeners (the ones with slots) work in emergencies but remove uneven amounts of steel and can damage blade geometry. Electric sharpeners like the Work Sharp Culinary E5 offer convenience at the cost of control. Professional sharpeners exist too—Montreal's Jean-Talon Market hosts several vendors who'll sharpen knives while you shop for produce.
Storage matters as much as sharpening. Tossing knives in a drawer damages edges. Use a magnetic strip, a knife block, or blade guards. Never put quality knives in the dishwasher—the harsh detergents and banging around ruins handles and dulls