Making Your Own Infused Finishing Oils

Making Your Own Infused Finishing Oils
You'll learn how to infuse high-quality oils with aromatics like herbs, spices, and citrus to create professional-grade finishing oils at home. This guide covers the technical methods for heat-based and cold-infusion, safety protocols for preventing botulism, and flavor profiles that work with specific ingredients. Making your own oil allows you to control the quality of the base fat and ensures your final product is free from the cheap, oxidized oils often found in store-bought versions.
Finishing oils are the final touch on a dish—a drizzle of chili oil over a soft-boiled egg or a lemon-infused olive oil over grilled fish. They add fat, aroma, and texture. Most people settle for whatever is on the grocery shelf, but the difference between a mediocre meal and a standout dish often comes down to these final drops.
What is the Safest Way to Infuse Oil?
The safest way to infuse oil is through the cold-infusion method or a strictly controlled, low-heat method to prevent the growth of bacteria. Bacteria, specifically Clostridium botulinum, can thrive in anaerobic (oxygen-free) environments like oil. When you add fresh ingredients—like garlic or herbs—to oil, you create a risk if you don't manage temperature and moisture correctly.
If you're using fresh ingredients, you're playing with fire if you don't follow specific protocols. I'm not a doctor, but I've read enough about food safety to know that moisture is the enemy here. A single drop of water or a piece of unwashed, damp basil can ruin a batch. To keep things safe, you have two real choices: use dried ingredients or use a heat-based infusion that you then refrigerate immediately.
For the most reliable results, use dried aromatics. Dried ingredients have had the moisture removed, which significantly lowers the risk of bacterial growth. If you must use fresh, you need to be much more diligent about storage. Most homemade oil infusions should be kept in the refrigerator and used within a week or two.
Check the CDC guidelines on botulism if you're worried about food-borne illnesses. It’s better to be safe than sorry when you're playing with fat and aromatics.
Which Oil Should I Use for Infusions?
The best oil for your infusion depends entirely on the flavor profile you want to achieve and the temperature at which you'll use the oil. You shouldn't use a high-smoke-point oil for a delicate finishing touch, nor should you use a delicate oil for a high-heat process.
| Oil Type | Flavor Profile | Best Uses |
|---|---|---|
| Extra Virgin Olive Oil | Grassy, peppery, or fruity | Pasta, roasted vegetables, soups |
| Neutral Oil (Grapeseed/Canola) | Neutral, clean | Chili oil, garlic oil, spice infusions |
| Avocado Oil | Mild, buttery | High-heat infusions or finishing seafood |
| Toasted Sesame Oil | Nutty, intense | Asian-inspired dressings and noodles |
If you want a classic, high-end finishing oil, stick with a premium Extra Virgin Olive Oil (EVOO). Brands like Brightland produce oils that are incredibly vibrant, which makes them perfect for a simple lemon or rosemary infusion. If you're making a spicy chili oil, though, you'll want something more neutral like grapeseed oil. You don't want the heavy olive flavor competing with the heat of the peppers.
How Do I Make Infused Oil at Home?
You can use either the heat method for speed or the cold method for a more delicate, nuanced flavor profile. The heat method is faster and more consistent for spices, while the cold method preserves the volatile aromas of delicate herbs.
The Heat Method (Best for Spices and Chili)
- Place your oil and dried aromatics (like dried chili flakes or peppercorns) in a small saucepan.
- Heat the oil over very low heat. You aren't trying to fry these; you're just warming them. Keep the temperature below 200°F (93°C).
- Once the oil has taken on the color and scent of the aromatics (usually 15-30 minutes), remove it from the heat.
- Strain through a fine-mesh sieve or cheesecloth into a clean glass jar.
The Cold Method (Best for Herbs and Citrus)
- Place your aromatics (like rosemary or lemon zest) in a jar.
- Pour your oil over the ingredients until they are completely submerged.
- Let the jar sit in a cool, dark place for 3 to 7 days, shaking it once a day.
- Strain the oil and store it in the refrigerator.
One thing to remember: if you use fresh herbs for the cold method, you really should use them up within a few days. The moisture in the herbs can cause the oil to go rancid or, worse, develop mold. If you want to be extra careful, you can lightly toast your dried herbs in a pan first to drive off any remaining moisture before adding them to the oil.
It's a lot like the patience required for maintaining a sourdough starter—it's all about timing and environment. You can't rush the infusion process if you want the best flavor.
What Are the Best Flavor Combinations?
The best flavor combinations rely on the balance between the base oil's natural characteristics and the intensity of the additive. You want the infusion to complement the dish, not overwhelm it.
Here are a few combinations that never fail:
- Lemon and Thyme: Use a high-quality olive oil. This is incredible over grilled white fish or roasted asparagus.
- Garlic and Chili: Use a neutral oil like grapeseed. This is the foundation for a classic Chinese chili oil.
- Rosemary and Sea Salt: Use a buttery oil or a robust olive oil. This works beautifully on steak or roasted potatoes.
- Star Anise and Cinnamon: Use a neutral oil. This creates a warm, aromatic oil perfect for drizzling over roasted squash or pork.
When you're experimenting, don't be afraid to go bold. If you're using a heavy, peppery oil, a strong spice like star anise will hold its own. If you're using a light avocado oil, keep your aromatics subtle. It's a balancing act. If you go too heavy on the aromatics, you'll end up with a jar of flavored oil that tastes one-dimensional.
I've found that the most successful infusions often use a "dual" approach. For example, if you're making a citrus oil, use both the zest (for the aromatic oils in the skin) and a small amount of the juice (for the acidity), though the juice will make the oil cloudy and shorter-lived. Most pros stick to the zest for clarity and longevity.
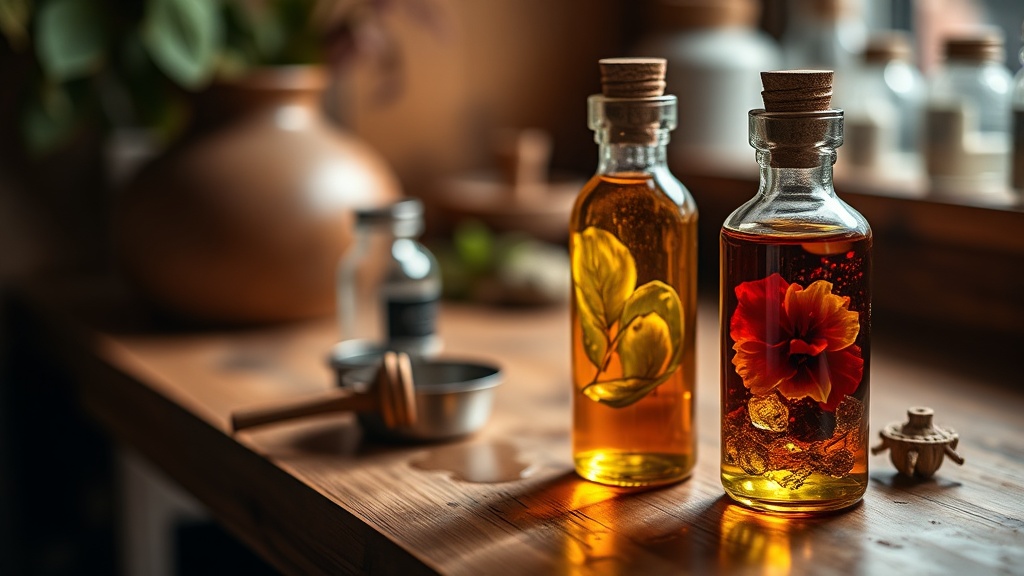
Always use high-quality glass containers for storage. Plastic can leach flavors into the oil, and it's not nearly as aesthetic when you're displaying these on your countertop. A small, amber-colored glass bottle is perfect because it protects the oil from light, which can degrade the flavor over time.
Keep your infusions in a cool, dark place—or the fridge—to ensure they stay fresh. If you notice any cloudiness or a change in smell, toss it. It's not worth the risk of consuming spoiled fat.
Steps
- 1
Select Your Base Oil
- 2
Prepare Your Aromatics
- 3
The Gentle Heat Method
- 4
Cooling and Straining
- 5
Storage and Safety